
Floor waterproofing refers to the process of applying a protective barrier on floors to prevent water damage. Floor water barrier is essential for maintaining building integrity and preventing expensive repairs. Leaking floors damage ceilings and rooms below requiring costly remediation. Water penetration weakens floor structures reducing their load-bearing capacity dangerously. Damp floors promote mould and mildew causing health problems for occupants. Floor moisture protection prevents these issues saving money and protecting health. It increases property values making buildings more attractive to buyers. Quality Floor damp-proofing installed during construction lasts 15 to 25 years. Professional waterproofing ensures complete protection meeting building standards and codes.
What Is Floor Waterproofing?
Floor waterproofing is applying protective coatings or membranes to floors preventing water from soaking through. It creates barriers that stop water from penetrating floor structures causing damage. Water can seep through floors damaging rooms below, rotting wooden structures and weakening concrete. Floor sealing keeps buildings dry, safe and prevents expensive water damage.
Bathrooms, kitchens, balconies and basements all need proper Moisture-proof flooring. Without waterproofing, water leaks cause mould growth, structural problems and unhealthy living conditions. Quality waterproof floor coating protects your property investment for many years.
A study from ResearchGate titled “Framework in Developing Model of Interfloor Leakage in High-Rise Residential Buildings in Malaysia” showed that interfloor leakage issues in strata communities focus on their impact on repair costs, occupant safety, and disputes. It explores management, legislation, and owner satisfaction, aiming to improve repair processes and reduce conflicts in strata management.
What Are the Different Types of Floor Waterproofing?
Floor waterproofing types include liquid membranes, cementitious coatings, bituminous systems, polyurethane, sheet membranes, epoxy and crystalline treatments. Considering all these aspects, the different types of moisture barrier for floors are categorized as follows.
1. Liquid Waterproofing Membrane on Floor
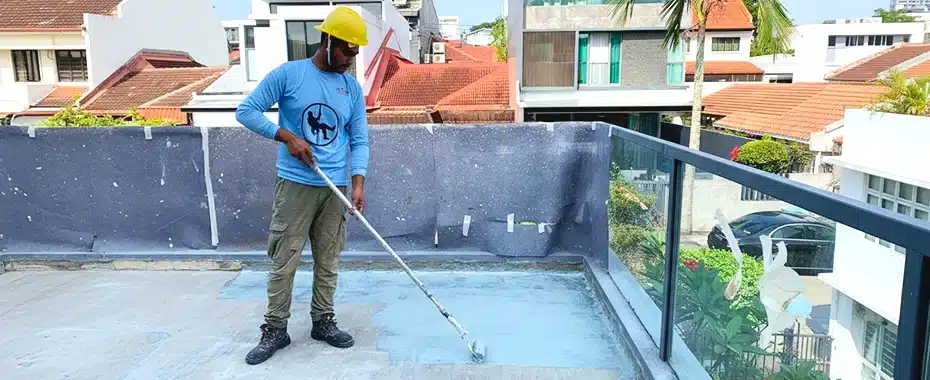
Contractors apply liquid waterproofing membrane by roller, brush, or spray onto the floor substrate. It forms a seamless, flexible moisture barrier that bonds directly to the surface. This system suits wet areas like bathrooms, balconies, and roof decks across Singapore. It resists water ingress and moves with the structure without cracking or splitting.
A study from the American Society of Civil Engineers entitled “Performance of Lightweight Wet-Room Floor with Two Waterproof Membranes” showed that liquid waterproofing membranes for floors shows that a twin-floor system with two membranes and a water-resistant cast compound effectively prevents water penetration. The secondary membrane ensures reliable protection, highlighting the importance of a redundancy layer for durable wet-room flooring.
2. Cementitious Floor Waterproofing
Cementitious waterproofing uses a cement-based compound mixed with water and applied to concrete. Applicators brush or trowel the coating directly onto the prepared floor substrate.
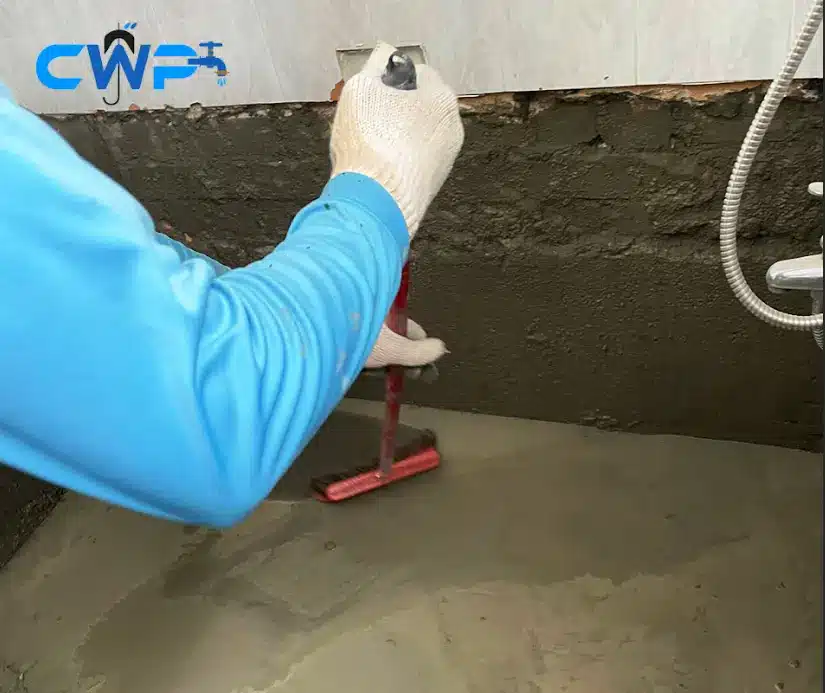
It provides a rigid, durable waterproof coating for low-movement internal wet areas. Bathrooms and water tanks in Singapore commonly rely on this floor sealing method.
A study from Trans Tech Publications Ltd integrated into the Scientific.Net website. entitled “Polymer-Modified Cement Waterproofing Coating and Cementitious Capillary Crystalline Waterproofing Materials: Mechanism and Applications” showed that polymer-modified cement coatings and crystalline waterproofing materials, highlighting their mechanisms, application factors, and growing use in modern buildings due to their performance, cost-effectiveness, and economic benefits.
3. Bituminous Floor Waterproofing
Bituminous waterproofing uses an asphalt-based compound to form a thick, protective coating. It creates a dense moisture barrier that repels water under heavy-duty conditions. This floor sealing method is common in basements, car parks, and podium decks. It performs well under high hydrostatic pressure and sustained water exposure.
A study from Science Direct entitled “Experimental investigation on mechanical properties of polyurethane modified bituminous waterproofing membrane” showed that Bituminous waterproofing membranes are polymer-modified bitumen sheets reinforced with fibres, providing a durable, flexible barrier against water infiltration on roofs, basements, and structures. Their mechanical strength, weather resistance, and versatility make them a widely used waterproofing solution in construction.
4. Polyurethane (PU) Floor Waterproofing
Polyurethane floor waterproofing delivers a seamless, highly flexible protective coating for floors. PU systems accommodate structural movement without cracking or losing their seal integrity. They suit exposed areas like rooftop terraces, balconies, and wet rooms in Singapore. PU waterproof coatings rank among the most durable systems for the building envelope.
A study from EasyChair Ltd entitled “Durability of polyurethane – cement floors”, showed that Polyurea-based polyurethane (PU) floor waterproofing offers excellent watertightness, high wear resistance, chemical and mechanical durability, and elasticity. Popular in construction since the 1980s, its proper application ensures long-lasting protection, while misuse can lead to performance issues.
5. Sheet Membrane Floor Waterproofing
Sheet membrane waterproofing uses pre-formed waterproof sheets bonded to the floor surface. These sheets create a uniform moisture barrier that resists water seepage consistently. Proper surface preparation is essential for full adhesion and long-term performance. They work well under floor tiles in bathrooms, podiums, and outdoor terraces.
A study from Science Direct entitled “12 – Waterproofing coatings and membranes”, showed that Sheet membrane floor waterproofing uses impermeable barriers, including polymeric sheets and cementitious coatings, to protect concrete. By blocking and refining pores, these systems prevent water ingress, provide integral waterproofing, and enhance durability for long-lasting concrete protection.
6. Epoxy Floor Waterproofing
Epoxy floor waterproofing provides a hard, chemical-resistant waterproof coating for concrete floors. It seals the slab against water, liquid spills, and chemical exposure. Epoxy systems suit car parks, industrial floors, and commercial kitchens in Singapore. They deliver both protective coverage and a clean, professional finish in one application.
A study from Science Direct entitled “Waterproof characteristics of nanoclay/epoxy nanocomposite in adhesively bonded joints”, showed that moisture can weaken epoxy adhesives and reduce joint strength. Adding nanoclay filler improves penetration resistance, lowers water absorption, and enhances adhesive performance. As a result, bonded joints maintain higher tensile strength even in moist environments, supporting more durable and reliable structural applications.
7. PU Injection for Floor Leak Repair
PU injection targets active water leaks through cracks in floor slabs and construction joints. A technician injects polyurethane resin directly into the crack or void. The resin expands on contact with water and seals the leak site permanently. This crack injection method is ideal for repairing water ingress in existing structures.
8. Crystalline Floor Waterproofing
Crystalline waterproofing uses reactive chemical compounds that interact with water and concrete. These compounds form insoluble crystals that fill pores, capillaries, and micro-cracks in the slab. The crystals grow deeper into the concrete over time for lasting moisture protection. This self-healing system suits basements, water tanks, and water-retaining structures in Singapore.
A study conducted by Science Direct entitled “Preparation and performance study of active chemicals in cementitious capillary crystalline waterproofing materials”, showed that Crystalline waterproofing (CCCW) enhances concrete durability by penetrating deeply, forming dense microstructures, and reducing harmful pores. New formulations with sodium acetate improve impermeability, strength, and chloride resistance, offering a safe, non-toxic, and efficient solution for long-lasting concrete protection.
Why Do You Need Floor Waterproofing Service?
You need floor waterproofing service to prevent water leaking to rooms below causing expensive damage and health problems. Floors in bathrooms, kitchens and balconies face water daily requiring protection. Without waterproofing, water seeps through floors damaging ceilings, walls and belongings below.
- Prevents Water Seepage and Dampness: Waterproofing blocks moisture from penetrating the floor substrate below. Problems on unsealed floors follow a clear progression. They start as surface dampness, advance to active seepage, then escalate to structural water ingress. Left untreated, the result is full slab failure and major structural costs. Acting early keeps problems at the surface, where they are easiest and cheapest to resolve.
- Protects Structural Integrity: Water weakens concrete and corrodes steel reinforcement bars inside the slab over time. Floor sealing prevents structural damage caused by sustained water exposure. A well-sealed floor significantly extends the lifespan of your building.
- Stops Mould and Mildew Growth: Moisture trapped under floors creates ideal conditions for mould and mildew. A reliable moisture barrier reduces humidity and prevents biological contamination. This improves indoor air quality and protects the health of all occupants.
- Reduces Maintenance and Repair Costs: Waterproofed floors need fewer repairs and interventions over their lifespan. Preventing leaks early is far cheaper than fixing structural damage later. Proper waterproofing maintenance saves significant long-term costs for building owners in Singapore.
- Counters Singapore’s High Humidity and Rainfall: Singapore’s tropical climate brings constant humidity and heavy monsoon rainfall. Floors without a moisture barrier absorb ambient moisture continuously throughout the year. Sealing the floor keeps surfaces dry, stable, and free from water damage.
- Increases Property Value: A well-waterproofed building retains its market value for longer periods. Buyers and tenants look for properties free from leaks and water damage. Proper floor sealing is a strong selling point in Singapore’s competitive property market.
- Protects Floor Finishes and Fittings: Water seepage stains, warps, and damages floor coverings and fittings over time. Waterproofing protects tiles, vinyl plank, timber, and other floor materials. It keeps your interior looking clean and professionally maintained at all times.
- Meets Singapore Building Code Requirements: Singapore’s building regulations require waterproofing in all wet areas. Proper floor sealing ensures compliance with BCA standards and guidelines. Non-compliance leads to penalties or costly rectification works during future inspections.
Why Floor Waterproofing and Wall Waterproofing Must Work Together?
Floor and wall waterproofing must work together to form a complete, watertight barrier across all surfaces. Water does not just stay on floors but splashes onto walls constantly. Gaps between floor and wall waterproofing create leak paths allowing water through. Proper waterproofing overlaps floor and wall systems at junctions preventing leaks.
- Water Travels Along Floor-to-Wall Joints: Water enters at the floor-to-wall junction if both surfaces are left unsealed. This joint is one of the most vulnerable points in any wet area. Coordinating floor and wall waterproofing closes this common entry point effectively.
- Hydrostatic Pressure Acts in All Directions: Water pressure pushes upward through floors and sideways through walls simultaneously. Waterproofing only the floor leaves walls exposed to moisture and seepage. A combined system resists hydrostatic pressure from every direction effectively.
- Prevents Corner Leaks in Wet Areas: Corners where floors meet walls are among the most common leak zones. Wall waterproofing extends into these corners to reinforce the sealed floor below. Together, they create a watertight enclosure in bathrooms and kitchens.
- Ensures Full Coverage in Bathrooms and Wet Rooms: Bathrooms face constant water exposure on both floor and wall surfaces. Waterproofing only the floor leaves wet walls vulnerable to seepage and dampness. Full coverage delivers fewer callbacks and longer-lasting protection overall.
- Protects Neighbouring Units in High-Rise Buildings: In Singapore’s HDB flats and condominiums, leaks travel between floors and walls. A floor leak can damage the ceiling of the unit directly below. Combined floor and wall waterproofing prevents disputes and liability issues between neighbours.
- Strengthens the Longevity of the Waterproofing System: A holistic waterproofing strategy outlasts any partial or incomplete treatment. Moisture always finds the weakest point in any protective system. Sealing both floors and walls removes those weak points entirely.
When Should You Apply Floor Waterproofing?
You should apply floor waterproofing during new construction, before tiling, after renovation, or when leaks or dampness appear. Use water-resistant flooring systems immediately when you notice leaks or dampness appearing. Chemical infusion waterproofing is especially effective after flooding or heavy rain that has damaged existing waterproofing. Waterproof floors when installing new bathrooms or wet areas from scratch. Basement floors need waterproofing during construction to prevent future groundwater problems. Balcony floors require waterproofing before tiling, protecting rooms below.
- During New Construction: Apply waterproofing to all wet area floors before screeding and tiling begins. This is the most cost-effective time to install a full membrane system. Early application protects the slab from the first day of occupation onwards.
- Before Tiling or Laying Floor Finishes: Always apply a waterproof membrane before installing tiles or floor coverings. Tiling over an unsealed substrate traps moisture and creates problems later. Proper sequencing protects both the floor finish and the substrate below.
- During Renovation or Hack-and-Redo Works: Renovation is the ideal time to replace ageing or failed waterproofing systems. Hacking tiles exposes the substrate for full surface preparation and re-application. Use this opportunity to upgrade to a higher-performance waterproofing solution.
- When You Notice Staining, Seepage, or Damp Patches: Visible staining or damp patches signal that your waterproofing system is failing. Address these signs early before moisture causes structural damage or mould. Prompt action keeps repair costs manageable and prevents further deterioration.
- Before Applying New Floor Finishes Over Existing Floors: Seal the existing floor substrate before overlaying with new vinyl, timber, or tiles. An unsealed substrate lets moisture build up under the new covering. This causes adhesion failure, warping, and mould growth beneath the finish layer.
Can Floor Waterproofing Prevent Mould and Dampness?
Yes, floor waterproofing can prevent mould and dampness when applied correctly creating complete barriers. A properly applied moisture barrier stops water from seeping into the floor substrate. Without moisture reaching the slab, mould and mildew spores cannot germinate under tiles or floor coverings. The protective coating, once fully cured, removes the dampness that biological growth depends on. In Singapore’s humid tropical climate, floor sealing is one of the most effective tools against recurring dampness and musty odours. It also preserves indoor air quality and the long-term health of the building itself.
What Happens If You Delay Floor Waterproofing Repairs?
Water seepage spreads and causes serious, escalating structural damage. The deterioration is gradual: surface dampness becomes active seepage. Active seepage weakens the screed layer and exposes the slab below. From there, full structural water ingress is a serious and costly outcome. Repair costs increase significantly the longer you wait to intervene. In high-rise buildings across Singapore, delayed repairs regularly damage neighbouring units. Steel reinforcement bars corrode, screed layers hollow out, and floor finishes detach prematurely. Acting early on waterproofing repairs saves time, money, and structural integrity.
What Materials Are Used in Floor Waterproofing?
Floor waterproofing materials include liquid membranes, cementitious coatings, polyurethane systems, bituminous compounds, epoxy coatings, crystalline treatments, sheet membranes, and waterproof sealant products for joints and edges.
Key materials used across floor waterproofing systems in Singapore:
- Polyurethane Liquid Membrane: a flexible, seamless waterproof coating for wet and exposed floor surfaces
- Cementitious Waterproofing Compound: a cement-based mixture applied directly to concrete substrates
- Bituminous Membrane: an asphalt-based barrier for heavy-duty and below-grade floor applications
- Epoxy Waterproof Coating: a hard, chemical-resistant floor seal for industrial and commercial spaces
- Crystalline Waterproofing Compound: a reactive treatment that seals pores and micro-cracks within the slab
- Sheet Membrane: pre-formed waterproof sheets bonded to floor surfaces before tiling begins
- Polyurethane Injection Resin: used in crack injection to seal active leaks in floor slabs
- Waterproof Sealant: applied to perimeter joints, expansion gaps, and floor-to-wall junctions
- Acrylic Waterproofing Coating: a cost-effective moisture barrier for low-traffic wet areas
- Silicone Sealant: applied at floor-to-wall junctions and movement joints to close gaps
These materials range from entry-level acrylic sealants to high-performance PU and crystalline systems. Choosing the right material depends on the area’s exposure level, traffic, and movement risk.
How Do You Waterproof a Floor?
You waterproof a floor by preparing the surface, priming, applying the membrane, sealing all joints, and flood-testing before finishing.
Step 1: Inspect the Floor Surface
Check the floor for cracks, voids, and signs of water seepage or dampness. Identify all weak points, including joints and the floor-to-wall junction.
Step 2: Prepare the Surface
Remove all loose material, dust, and contaminants from the floor substrate. Repair cracks and voids with a suitable patching compound and allow to cure.
Step 3: Apply Primer
Apply a bonding primer to the prepared and dry floor substrate. Allow the primer application to cure before proceeding to the membrane stage.
Step 4: Seal Joints and Corners
Apply waterproof sealant or reinforcement tape to all joints, corners, and edges. The floor-to-wall junction in wet areas needs the closest attention at this stage.
Step 5: Apply the First Coat of Waterproofing
Apply the first coat, meaning the first full application layer, evenly across the floor. A “coat” here refers to a single spread of the waterproofing material, not a decorative finish. Use a brush, roller, or spray applicator based on the product specification.
Step 6: Allow to Cure
Allow the first coat to dry and cure fully as per the manufacturer’s guidelines. Rushing this stage weakens the sealed barrier and reduces its protective lifespan.
Step 7: Apply the Second Coat
Apply the second coat in a perpendicular direction for complete, even coverage. This eliminates pinholes and gaps in the waterproof membrane below the floor finish.
Step 8: Conduct a Flood Test
Seal the floor drain and fill the waterproofed area with water for 24 to 48 hours. Inspect for any signs of seepage before moving to the finishing stage.
Step 9: Apply the Finish Layer
Once the flood test passes, install floor tiles, screed, or your chosen floor covering. Ensure the finish layer does not puncture or damage the waterproofing membrane.
How Do You Waterproof Bathroom Flooring?
You waterproof bathroom flooring by sealing the substrate, joints, and floor-to-wall junctions before tiling.
Step 1: Hack and Prepare the Substrate
Remove existing tiles and clean the concrete substrate and screed layer thoroughly. Repair any cracks, hollow spots, or damaged areas before waterproofing begins.
Step 2: Screed the Floor if Needed
Lay a fresh screed layer to level the floor and create a smooth base. To screed the floor correctly, ensure it slopes toward the floor trap for drainage. The word “screed” here means both the material and the act of levelling with it.
Step 3: Prime the Surface
Apply a waterproofing primer to the clean, dry substrate before any membrane work. Allow full drying time before moving to the membrane application stage.
Step 4: Seal the Floor-to-Wall Junction
Apply waterproof tape or sealant at the junction between the floor and wall. This junction is the most leak-prone area in any bathroom or wet room.
Step 5: Apply the Waterproofing Membrane
Apply two coats of liquid membrane or PU waterproofing to the floor surface. Extend the waterproofed coating up the wall by at least 100 to 200mm.
Step 6: Conduct a Flood Test
Seal the floor trap and fill the bathroom floor with water for 24 hours. Check the slab and walls below for signs of seepage before tiling proceeds.
Step 7: Tile Over the Waterproofed Surface
Once the flood test passes, install your chosen floor and wall tiles. Use waterproof tile adhesive and grout to maintain the integrity of the sealed system.
A study from ResearchGate titled “Study on Application of Building Waterproof Construction Technology” showed that Floor waterproofing, especially in areas like bathrooms, involves setting concrete barriers at thresholds, ensuring proper drainage, and applying reinforced waterproof layers to prevent leaks. Proper sealing of pipes, floor drains, and wall connections is crucial for preventing water penetration and damage.
How Do You Waterproof Kitchen Flooring?
You waterproof kitchen flooring by sealing the substrate, perimeter joints, and drainage points before installing the finish layer.
Step 1: Clear and Inspect the Floor
Remove all appliances, fixtures, and existing floor coverings from the kitchen. Inspect for cracks, water stains, or signs of dampness and moisture damage.
Step 2: Repair the Substrate
Fill cracks and uneven areas with an appropriate patching compound. Allow all repairs to cure fully before the waterproofing application begins.
Step 3: Apply a Primer Coat
Prime the floor surface to improve adhesion of the protective waterproofing coating. Allow the primer to dry completely before moving to the next step.
Step 4: Seal Joints and Perimeter Edges
Apply waterproof sealant along all perimeter joints, corners, and drainage areas. Focus on areas around kitchen fixtures and floor waste outlets.
Step 5: Apply Waterproofing Membrane
Apply two coats of liquid waterproofing or an epoxy waterproof coating to the floor. Allow each coat to cure fully before applying the next layer on top.
Step 6: Install Floor Finish
Once the protective coating cures, install tiles, vinyl plank, or your preferred floor covering. Use waterproof adhesive to maintain the full integrity of the system.
How Do You Waterproof Floor Tiles?
You waterproof floor tiles by sealing the grout lines, tile surface, and perimeter joints with a suitable waterproof sealant.
Step 1: Clean the Tile Surface
Remove all dirt, grease, and cleaning product residue from the tile floor. Allow the surface to dry completely before applying any sealant product.
Step 2: Repair Damaged Grout
Remove and replace any cracked, hollow, or deteriorating grout lines. Fresh, sound grout provides a reliable base for the sealant to bond to.
Step 3: Apply Grout Sealer
Apply a penetrating grout sealer to all grout lines across the floor surface. Work in sections using a brush or roller applicator for even, complete coverage.
Step 4: Seal the Tile Surface if Required
For porous tiles, apply a tile sealer over the entire floor surface. This extra waterproof coating adds meaningful moisture protection to porous floor materials.
Step 5: Seal Perimeter Joints
Apply silicone sealant along all joints where tiles meet walls or fittings. These perimeter joints are common water ingress points in wet areas.
Step 6: Allow Full Curing Time
Allow the sealant and sealer to cure fully before exposing the floor to water. Check the manufacturer’s guidelines for minimum curing times before use.
How Do You Waterproof Outdoor Flooring?
You waterproof outdoor flooring by applying a UV-resistant, flexible waterproofing membrane to all exposed floor surfaces.
Step 1: Clean the Surface Thoroughly
Remove moss, algae, dirt, and loose material from the outdoor floor surface. Use a pressure washer or stiff brush for deep cleaning and thorough surface preparation.
Step 2: Repair Cracks and Joints
Fill all cracks, expansion joints, and surface voids with an appropriate filler compound. Allow all repairs to cure fully before waterproofing application begins.
Step 3: Apply a Bonding Primer
Apply a primer suited to outdoor, exposed surfaces and weathering conditions. This step strengthens the adhesion of the protective waterproofing membrane to the substrate.
Step 4: Seal All Joints and Perimeter Edges
Apply flexible waterproof sealant to all movement joints and perimeter edges. Outdoor floors expand and contract with Singapore’s temperature and humidity changes.
Step 5: Apply Waterproofing Membrane
Apply two coats of UV-stable polyurethane or bituminous waterproofing membrane. Ensure full, consistent coverage with no pinholes or uncovered areas anywhere.
Step 6: Apply a Non-Slip Weatherproof Topcoat
Finish with a non-slip, UV-resistant topcoat suited for outdoor use. This protective layer shields the waterproofing membrane and improves safety underfoot.
How Do You Choose the Best Floor Waterproofing Company in Singapore?
You choose the best floor waterproofing company by checking credentials, experience, warranty terms, and past work quality.
Step 1: Verify Their Licence and Accreditation
Confirm the contractor holds a valid BCA licence for waterproofing works. Licensed companies follow Singapore’s building standards and use approved waterproofing systems. Never engage an unlicensed contractor for any floor sealing or membrane work.
Step 2: Check Their Experience With Your System Type
Ask whether they have handled your specific waterproofing system before. A company experienced in PU injection differs from one specialising in crystalline treatments. Match their expertise to your floor type and protection needs.
Step 3: Review Their Past Projects and Portfolio
Ask for photos or case studies of completed floor waterproofing projects. Look for work on similar spaces, whether bathrooms, roof decks, or industrial floors. Strong past work signals reliable application quality and attention to detail.
Step 4: Ask About the Materials They Use
A reputable waterproofing contractor uses proven, high-performance materials and coatings. Ask for product data sheets for the waterproof membrane or sealant they propose. Avoid companies that cannot name the brands or systems they apply.
Step 5: Request a Detailed Written Quotation
Get at least three quotes before committing to any waterproofing contractor. Each quote should clearly list materials, labour, area coverage, and preparation work. Vague quotes often lead to hidden costs and scope disputes later.
Step 6: Confirm the Warranty They Offer
A reliable contractor backs their floor waterproofing work with a written warranty. Most quality systems carry a workmanship warranty of five to ten years. Avoid any contractor who hesitates or refuses to offer a written guarantee.
Step 7: Read Reviews and Ask for References
Check Google reviews, HDB forums, and property groups for honest feedback. Ask the contractor directly for references from past clients in Singapore. Speaking to a previous customer gives you real insight into their service quality.
Step 8: Assess Their Communication and Professionalism
A good waterproofing company responds promptly, explains clearly, and advises honestly. They should inspect your floor before recommending any system or material. Poor communication at the quoting stage often predicts problems during the actual work.
How Much Does Floor Waterproofing Cost in Singapore?
Floor waterproofing costs in Singapore range from S$20 to S$50 per square metre depending on system type and floor condition. Bathroom floor waterproofing (Wet area floor waterproofing) costs S$300 to S$1,000 for complete treatment including materials and labour. Kitchen floor waterproofing costs S$200 to S$600 for localized wet areas. Balcony floor waterproofing costs S$1,000 to S$3,500 depending on size and complexity. Basement tanking costs SGD $25 to $50 per square metre for complete systems. Commercial floor waterproofing costs S$30 to S$60 per square metre for demanding applications.
How Long Does Floor Waterproofing Last?
Floor waterproofing lasts 10 to 25 years in Singapore depending on type, application quality and floor usage. Cementitious floor waterproofing lasts 10 to 15 years in bathrooms and wet areas. Liquid membrane waterproofing lasts 15 to 20 years with proper installation and maintenance. Polyurethane floor waterproofing lasts 15 to 20 years even in harsh outdoor conditions. Sheet membrane systems last 20 to 25 years on basement and commercial floors. Epoxy anti-leak floor system lasts 20 to 30 years in industrial applications. Crystalline waterproofing lasts the lifetime of concrete floors permanently. Professional application maximizes Anti-leak floor system lifespan significantly.
FAQ’s
Yes, floor waterproofing can stop active leaks using PU injection systems. Polyurethane resin expands inside cracks and seals water ingress on contact. Engage a licensed waterproofing contractor to assess the leak severity and recommend the right solution.
Yes, you can apply waterproofing without hacking tiles in certain situations. Injection-based systems and surface waterproof sealants work over existing floor tiles. However, hacking provides better adhesion and longer-lasting results for full membrane waterproofing systems.
Luxury vinyl plank is the best waterproof floor covering for pets in Singapore homes. It resists scratches, absorbs impact, and repels moisture from spills and accidents. It is also comfortable underfoot and available in many styles and finishes.
Yes, mould can grow under vinyl plank flooring if moisture becomes trapped beneath it. Poor installation, inadequate subfloor waterproofing, or active water leaks create ideal mould conditions. Always install a proper moisture barrier before laying vinyl plank flooring.
Natural timber tones, warm grey, and classic beige floors never go out of style. These neutral tones complement most interior styles and wall colour palettes. They remain consistently popular in both residential and commercial spaces across Singapore.
Light-coloured flooring in white, cream, or pale grey makes a room look bigger. Light tones reflect more natural light and visually expand the sense of space. Wide-plank formats in light colours amplify this effect even further.